Make Sure to Subscribe to Our Newsletter ✉️
Get the latest news and updates straight to your inbox.
Get the latest news and updates straight to your inbox.
Learn How to setup your WordPress SMTP for your WordPress Website to send emails from your Website using Gmail
Disclosure: Our content is reader-supported. This means we may receive a commission if you click some of our links. Learn More, why it's important and how you can support us.
WordPress uses Simple Mail Transfer Protocol (SMTP) to send emails. This is the standard way to send emails from a web server. WordPress comes with a built-in SMTP server, but it is not configured to work out of the box. That’s where WordPress SMTP comes in. WordPress SMTP is a plugin that allows you to configure your WordPress site to use an external SMTP server to send emails.
This can be useful if you want to improve your email deliverability or avoid spam filters. It is also important for sending important emails such as transactional emails. To use WordPress SMTP, you will need to sign up for an account with an SMTP provider and then enter your SMTP settings in the WordPress SMTP plugin. Once you have done this, you will be able to send emails from your WordPress site using the external SMTP server.
WordPress is a popular content management system (CMS) used by millions of websites. Many web hosting providers offer one-click installation of WordPress. Which makes it easy to get started. Once you have WordPress installed, you can use it to create a website or blog.
WordPress.com is a hosted solution, which means that you do not need to worry about installing or maintaining WordPress yourself. WordPress.com also offers a limited number of features and customization options.
WordPress.org is a self-hosted solution, which means that you will need to install WordPress on your own web server. WordPress.org gives you access to all of WordPress’ features and customization options.
One of the most common ways to send emails from WordPress is to use the Simple Mail Transfer Protocol (SMTP). SMTP is a protocol that is used to send email messages. You can configure WordPress to use an email service such as Gmail or Yahoo! Mail to send emails.
You can also use the PHP mail function or a third-party SMTP server. Using SMTP to send emails from WordPress helps to reduce the chances of your emails being marked as spam. When you use the PHP mail function, your email address is visible in the headers of the email. This can lead to your email being flagged as spam by some email providers.
By using SMTP, you can specify a different “from” address for your emails. This helps to protect your primary email address from being marked as spam. If you are not sure how to configure WordPress to use SMTP, check this article below see to setup SMTP on your site.
If you want to send emails from your WordPress site, you need to install an SMTP plugin. This will allow you to use the SMTP protocol to send mail, instead of the default PHP mail function. There are many plugins available that make it easy to set up SMTP on your WordPress site.
Fluent SMTP is a popular choice, and my favourite plugin too. There are many others to choose from, I’ll add them below. Installing an SMTP plugin is essential if you want to ensure that your emails are delivered successfully.
Here are the Best SMTP Plugins to use,
Fluent SMTP is the quickest and most advanced WordPress SMTP plugin. This plugin was designed for speed, dependability, and scalability. It connects WordPress Mail to your email service providers, which solves the problem of email delivery. Because these are native integrations, the emails will be sent very quickly.

FluentSMTP setup methods are available to link your site to the selected SMTP provider. It also supports integration with
It is one of the best free WordPress plugins for SMTP, You can connect as many email service providers as you like, and FluentSMTP will automatically send transactional and marketing emails. This is one of FluentSMTP’s unique features.
To configure WordPress SMTP settings, you will need to install an SMTP plugin. For more details, see the guide on How to install a WordPress Plugin. After you installed and activated the plugin, you need to configure your WordPress SMTP settings.
Google is one of the greatest email delivery services on the market. Fluent SMTP supports both free and paid (Google Workspace, formerly known as GSuite) emails. In this article, we will configure Fluent SMTP to work with Google.
The steps are as follows:
To start, you must first install and activate the Fluent SMTP plugin. The simplest option is to install it through the WordPress Admin Dashboard. Go to Plugins > Add New, Search for “Fluent SMTP” and then install and activate the plugin as seen in the screenshot below.
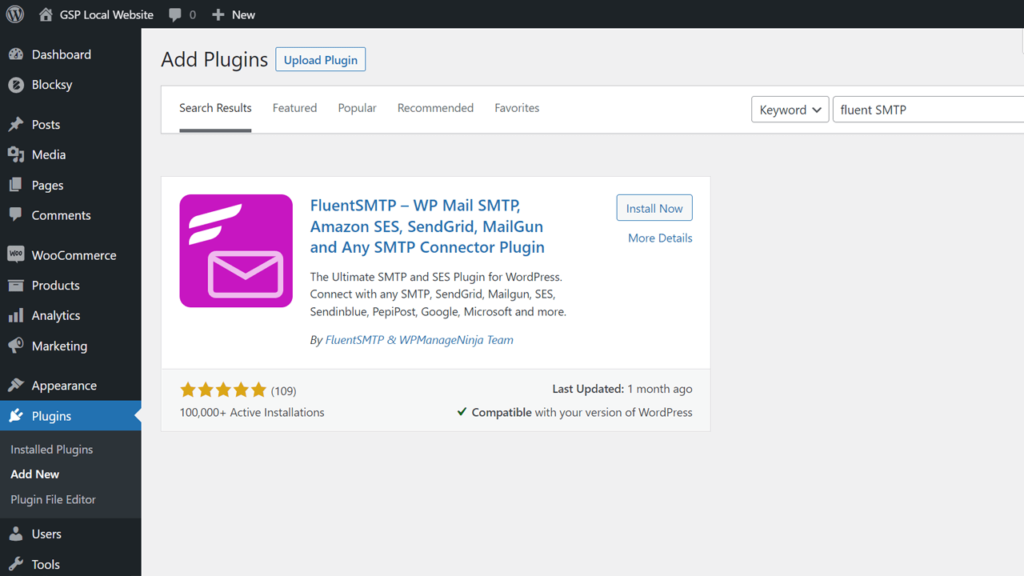
We are now ready to set up Fluent SMTP to deliver emails from our website to Google. Please follow the instructions below.
To create credentials. Please visit the Google Cloud Console Dashboard.
You may notice a popup asking you to pick your country and agree to the Terms of Service the first time you use Google Cloud Console. Proceed to the following step by clicking on AGREE AND CONTINUE.
Then we’ll need to make a Fluent SMTP Project. The option to create a new project is located in the top left corner under Select a Project or in the top right corner of the Dashboard section with CREATE PROJECT.
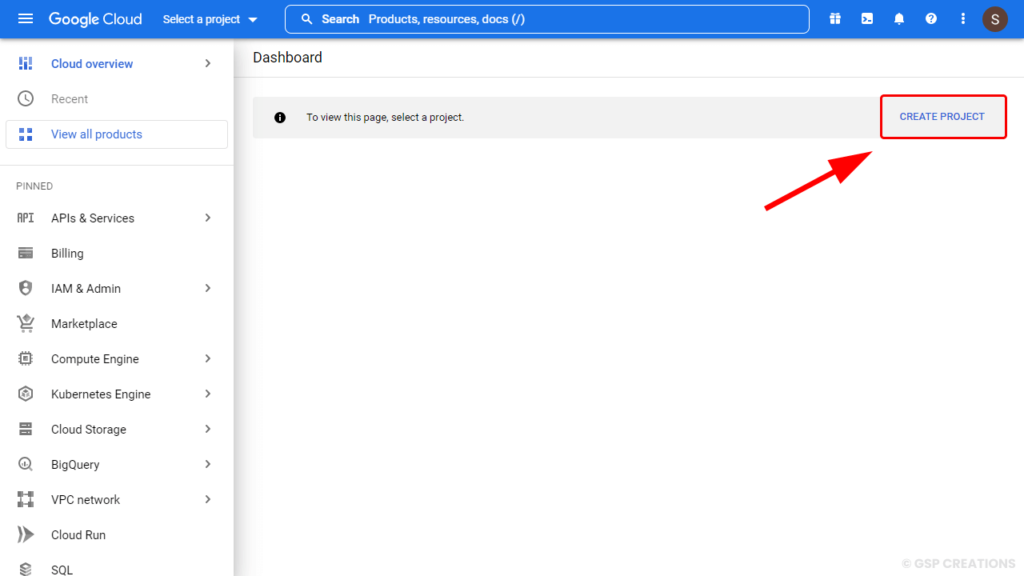
At this point, we must name the project. In this case, I used the Name “Fluent SMTP,” and the Location is “No Organization.”

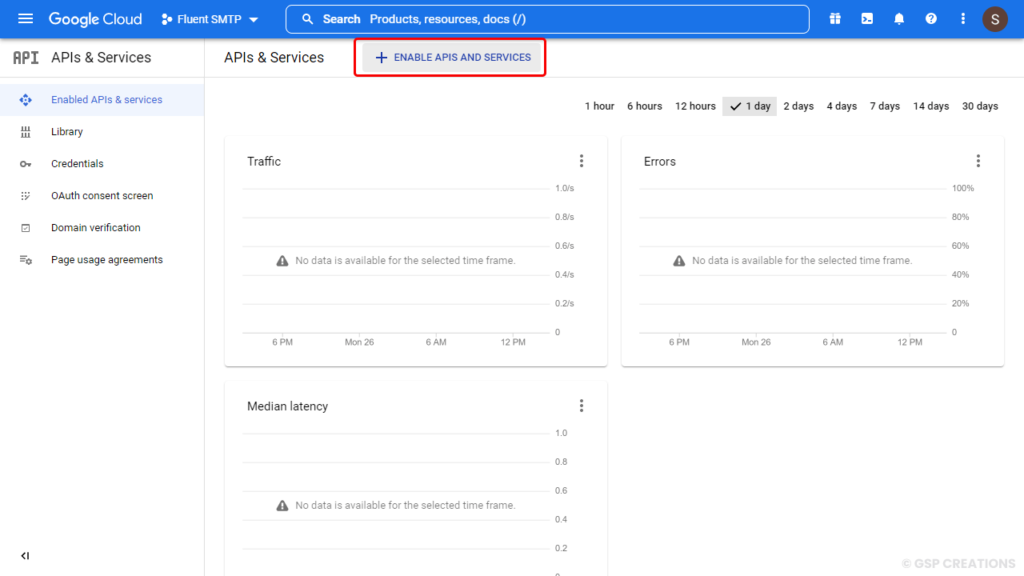
After we create the project, Google will take us to the project dashboard. The project’s GMAIL API must now be enabled. The option to enable APIs & Services may be found in the left sidebar under APIs & Services > Enabled API & Services, as shown in the screenshot below.
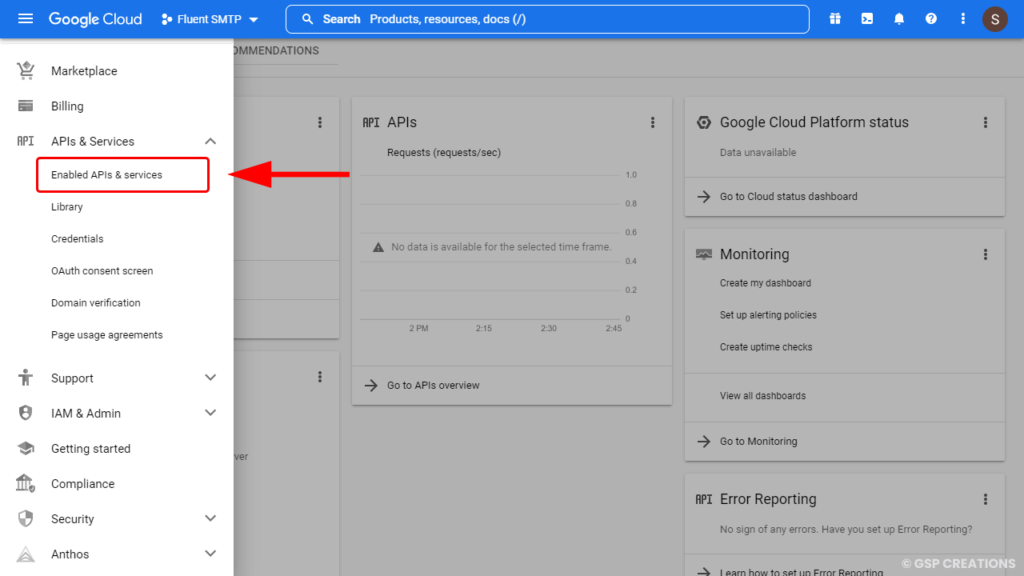
You must now click ENABLE APIS & SERVICES from the APIs & Services dashboard.
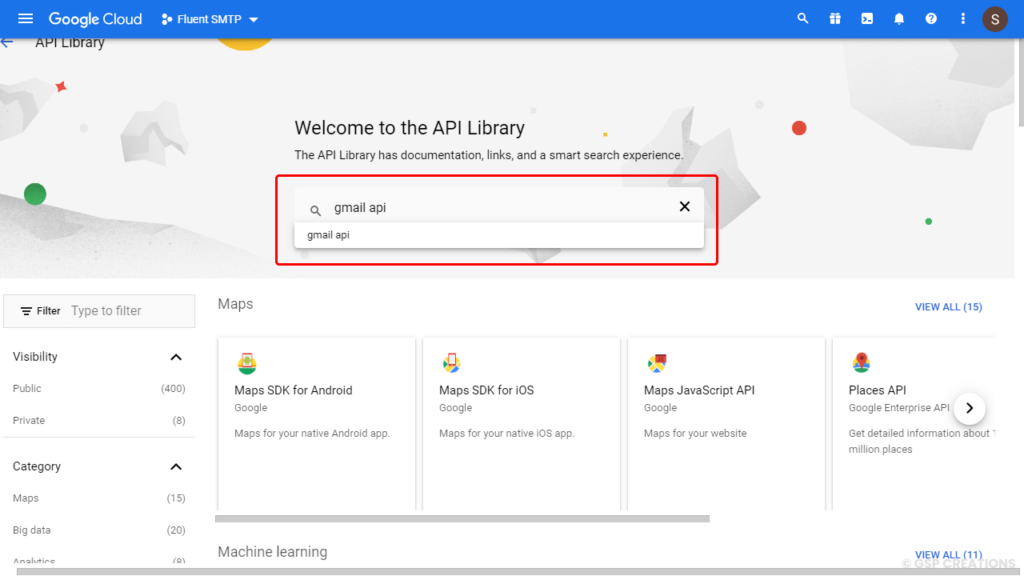
Enter “Gmail API” into the search bar.
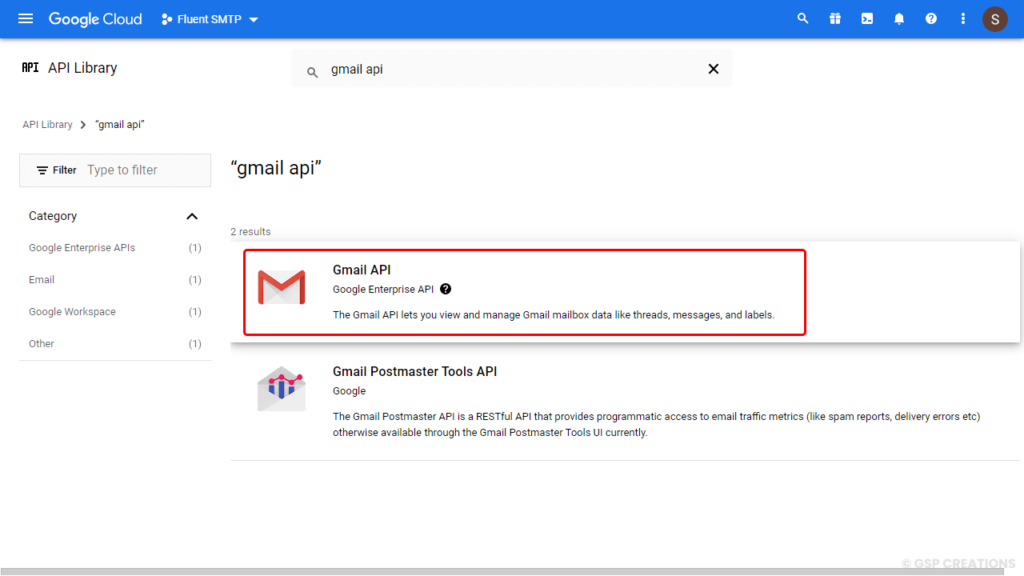
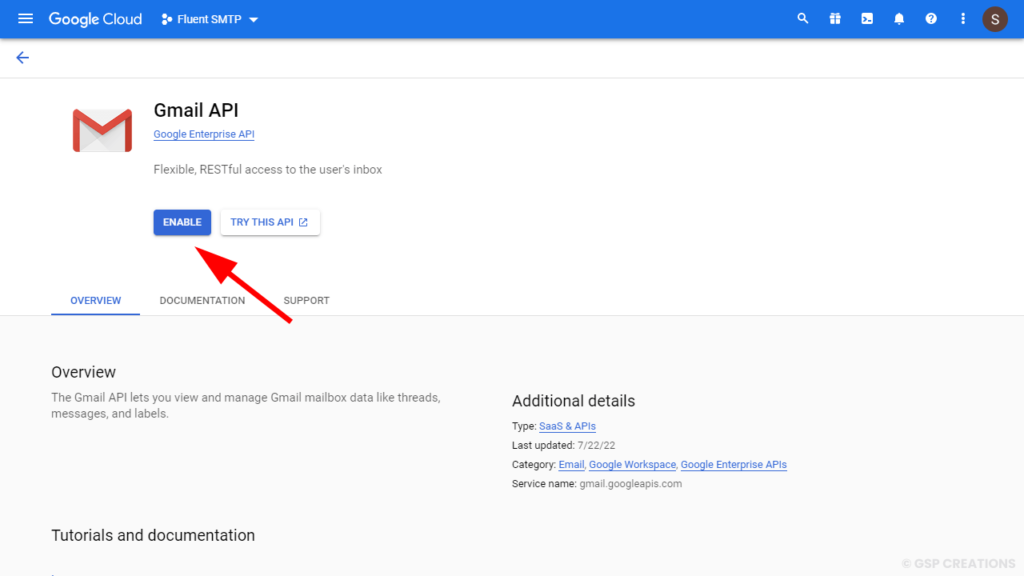
Now you must enable the API by clicking the ENABLE button, as seen below.
It only takes a few seconds to enable the API, after which we are redirected to the GMAIL API Dashboard, as shown below. This time, we’ll need to create the Fluent SMTP credentials by choosing CREATE CREDENTIALS.
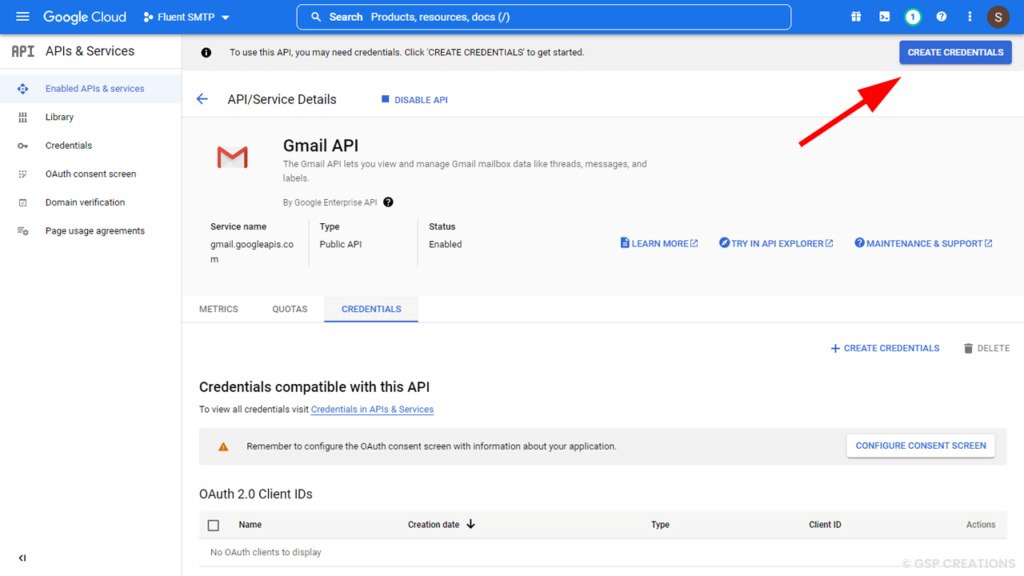
For the credential type, you must choose GMAIL API as the target GMAIL API that is already selected and USER DATA as the target accessible data.
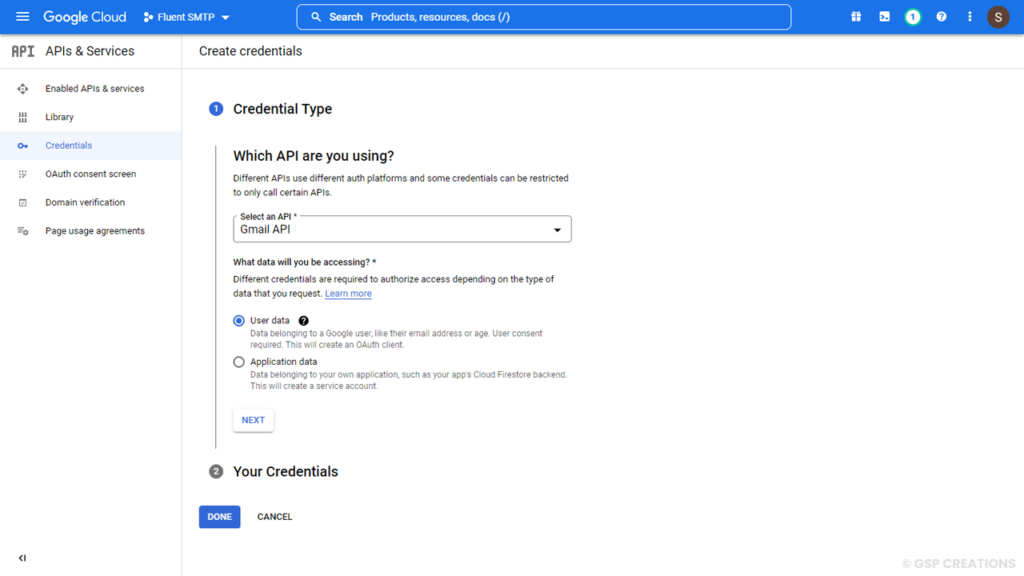
Now, on to the OAuth Consent Screen. Give a name for the App Name, an email address for support, and an email address for the developer’s contact information. The email addresses will be used to send emails from WordPress using the Fluent SMTP plugin. Once you’ve completed the inputs, click SAVE AND CONTINUE.
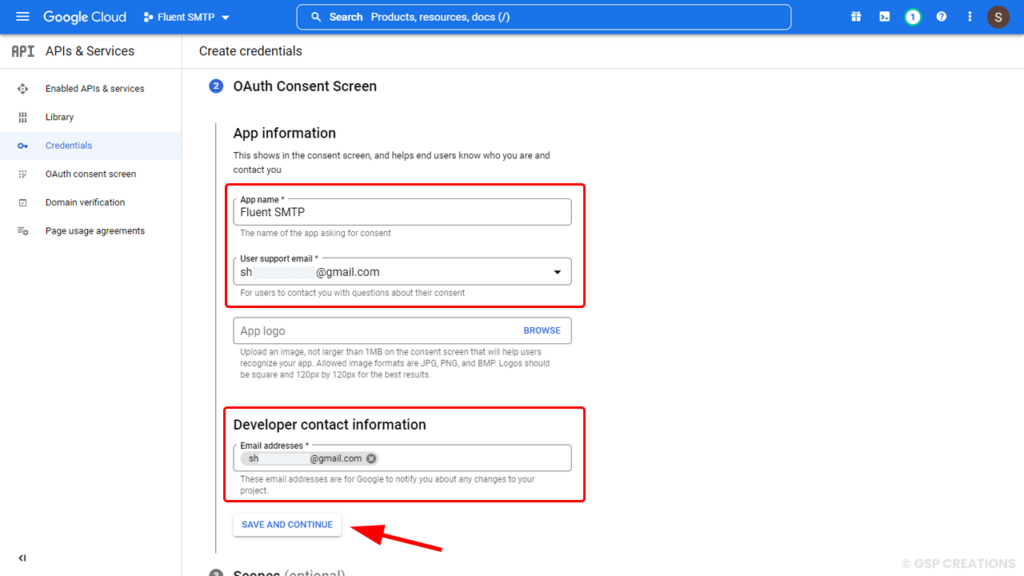
We don’t need to do anything for SCOPES settings for Fluent SMTP email delivery. You can still specify your own requirements if necessary.
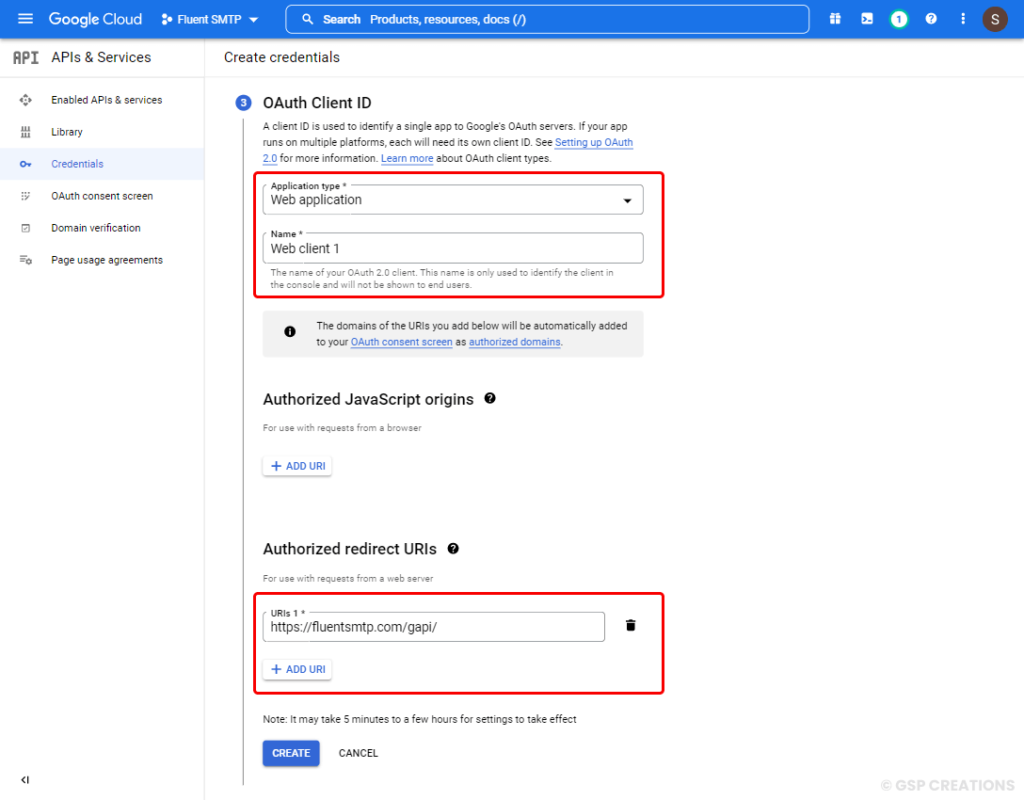
Now, for the OAuth Client ID, you must choose Web Application as the Application Type.
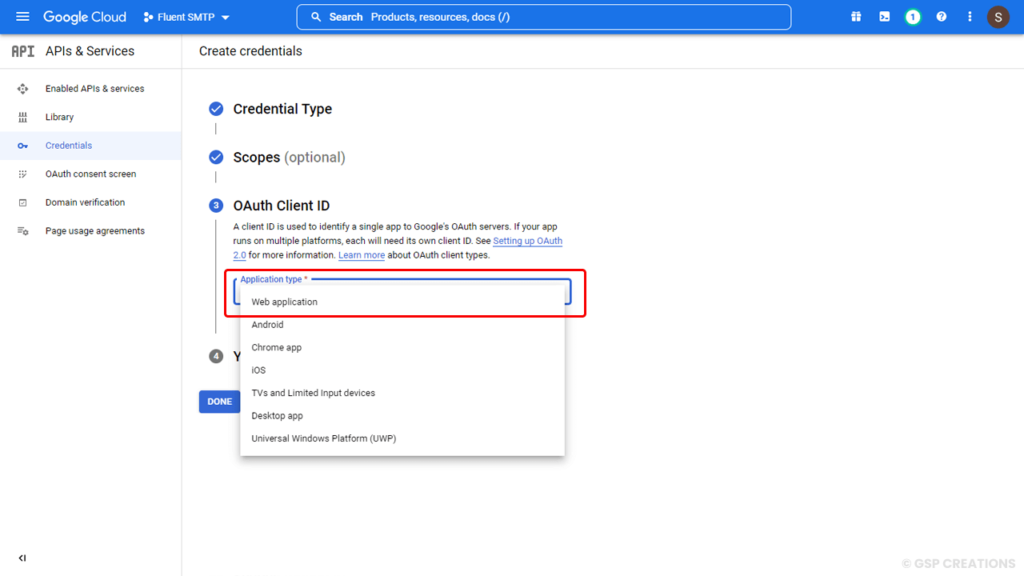
You must include an Authorized Redirect URI with the URL: https://fluentsmtp.com/gapi/
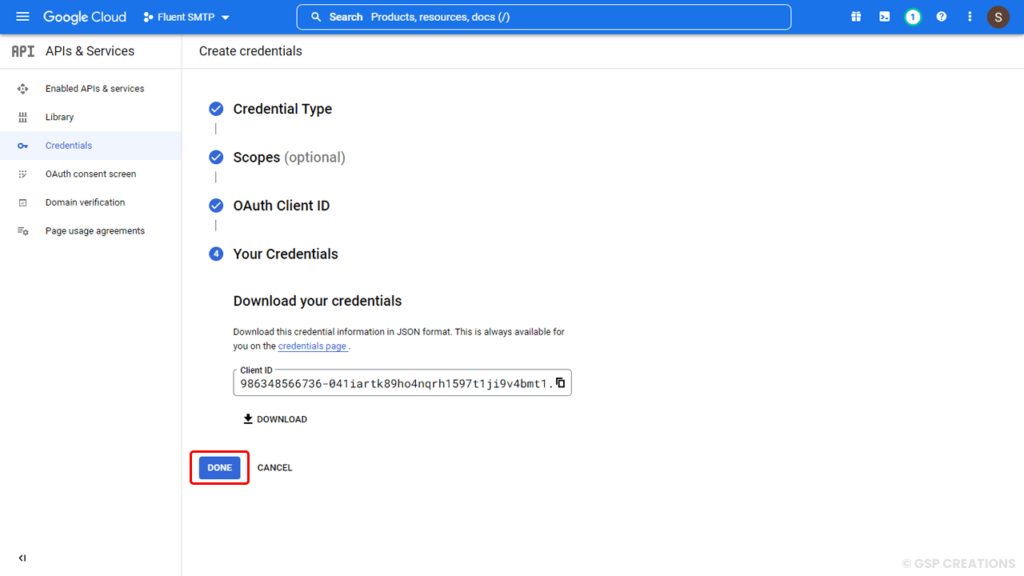
As a further step, you will be given a Client ID to use as a credential. We may skip downloading or saving it right now and just click DONE because we just finished constructing the Fluent SMTP credentials, which we will collect later in this guide.
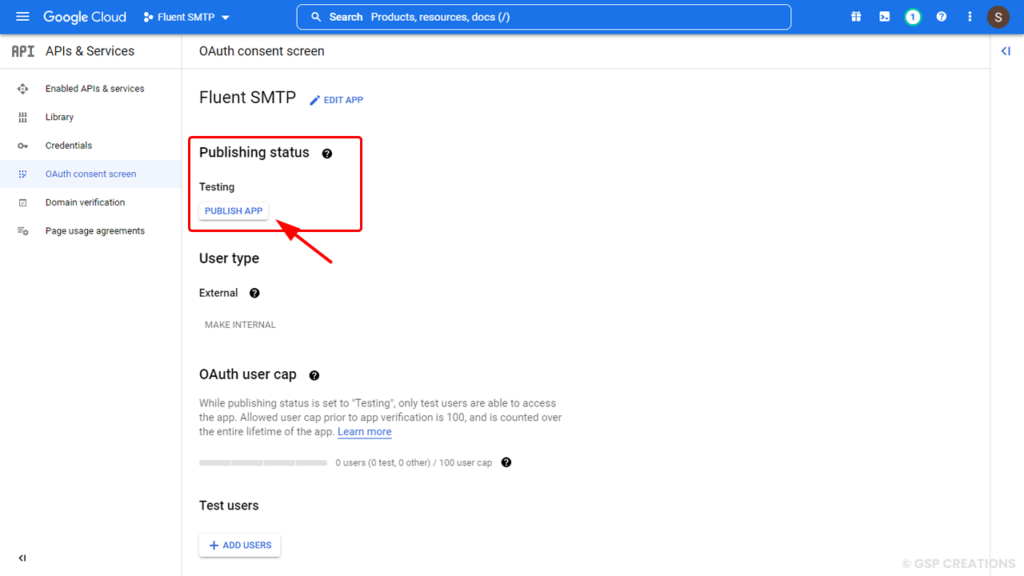
You must now publish the app that we just created. Navigate to the OAuth Consent Screen from the left sidebar and look for our app FluentSMTP. Now, in the Testing area, click the PUBLISH APP button.
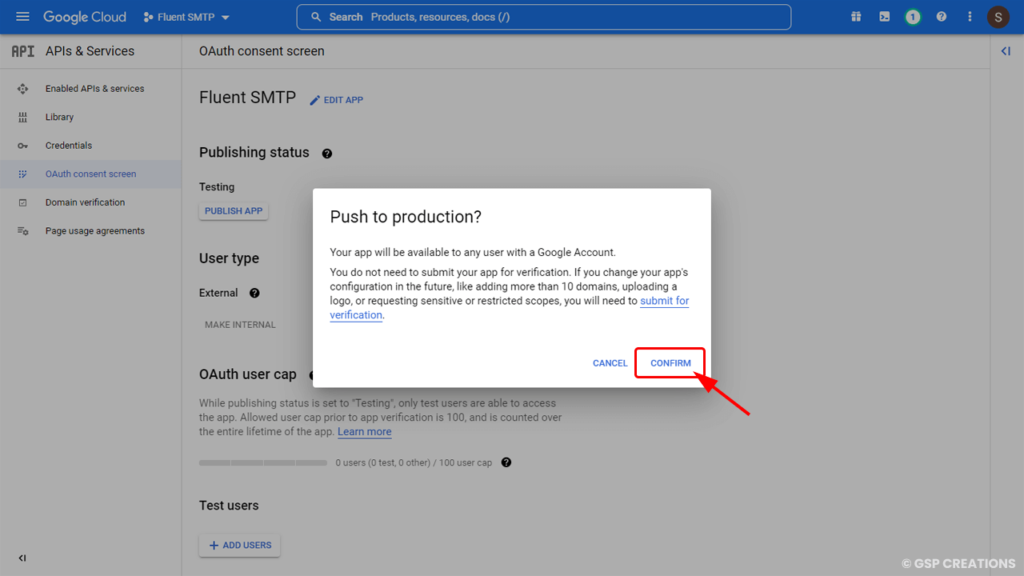
Please select CONFIRM from the Push to Production popup window when prompted to confirm.
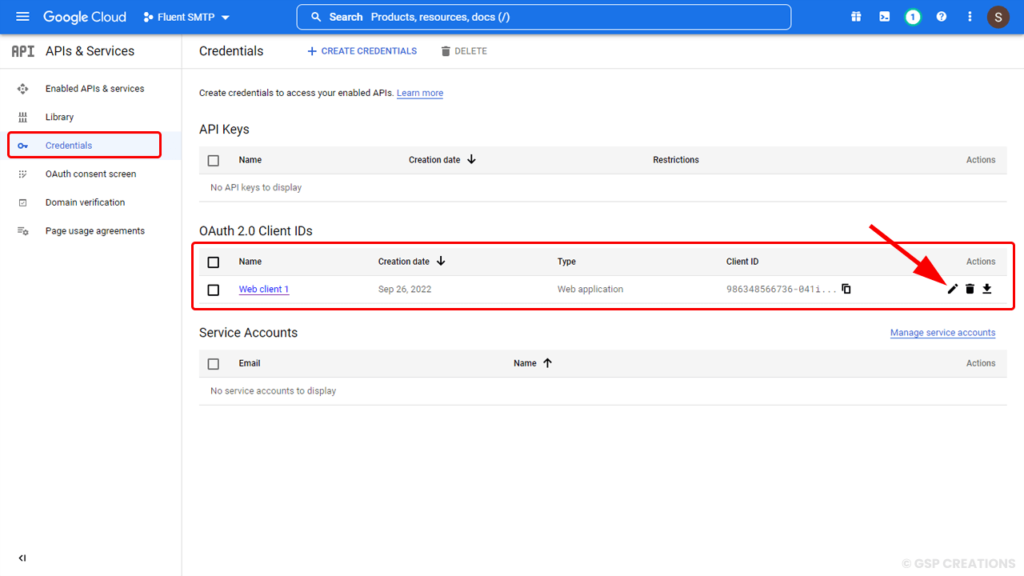
Now you will collect the necessary credentials. From the left sidebar, select Credentials. Locate the Project Name we created, “FluentSMTP,” and then click the Edit icon on the right side, as seen below.
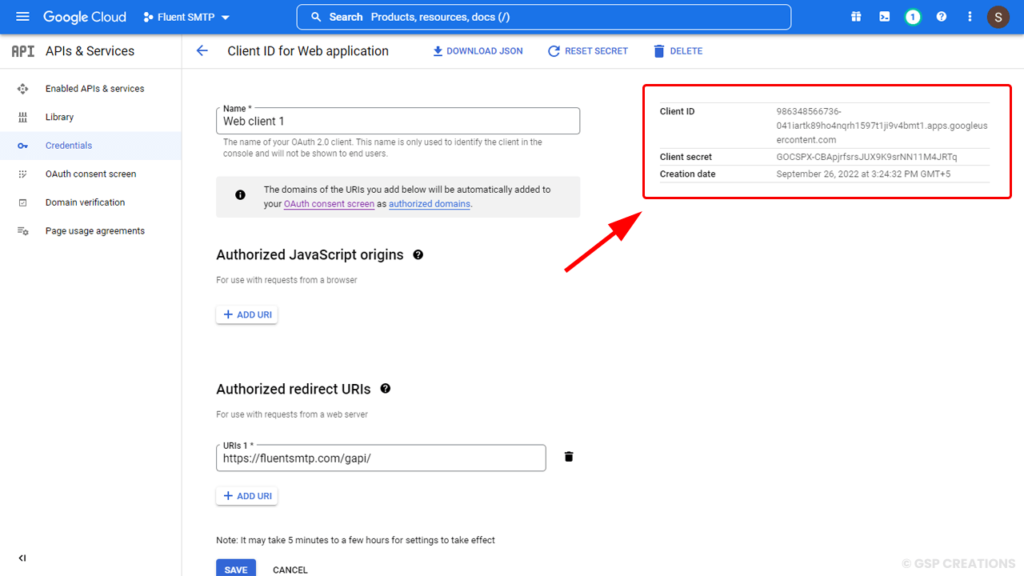
On the right, the Client ID and Client Secret will now be displayed. In the following steps, you will need to copy these two values and paste them into the Fluent SMTP Connection settings.
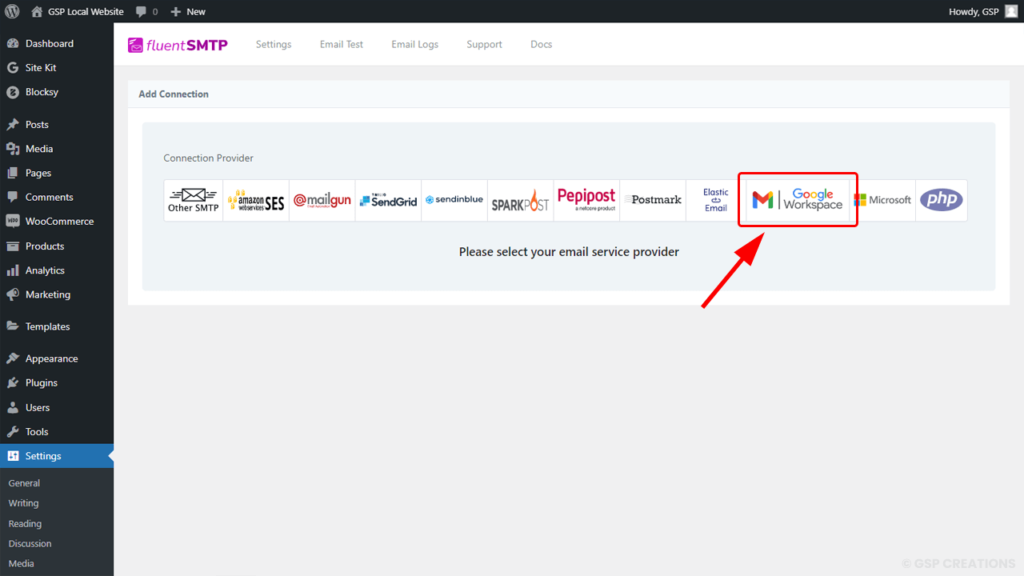
Go to Settings > Fluent SMTP on our website now. If no more connections are made, we will be given the options listed below. As the connecting method, we must select Google Workspace from the available alternatives.
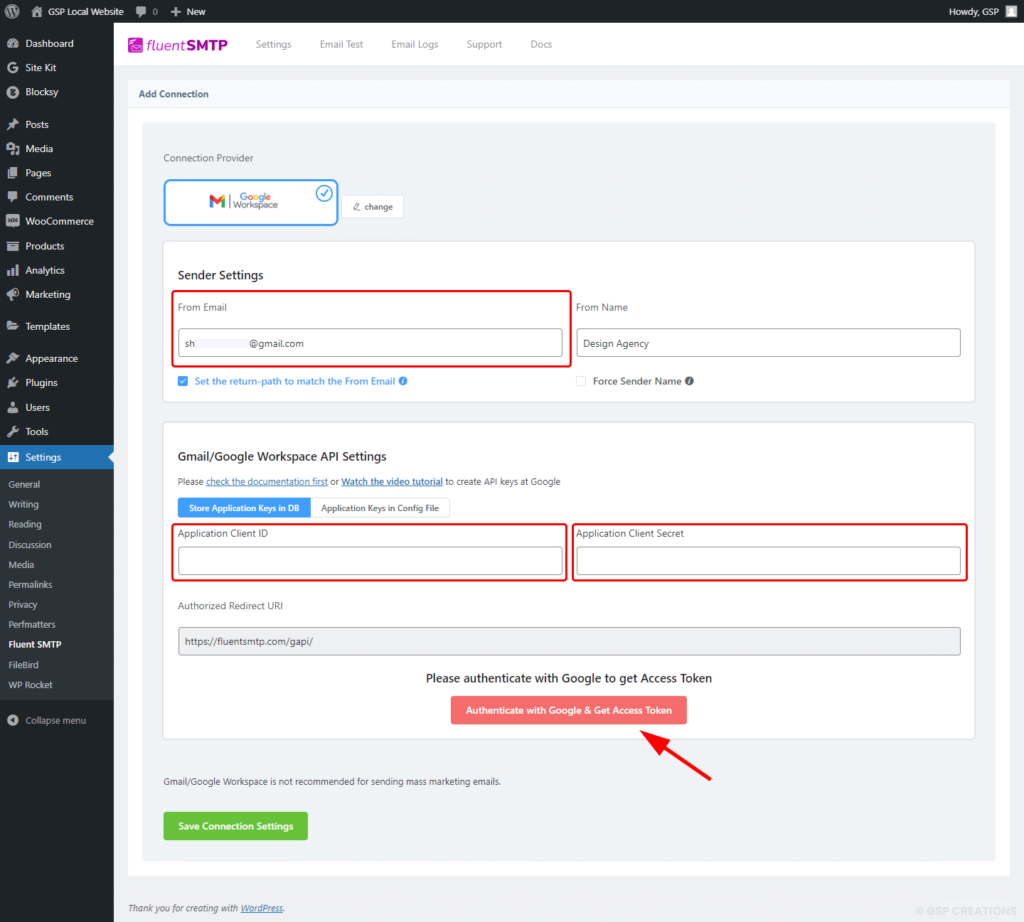
Set the From Email to the Gmail or Google Workspace Email address under Sender Settings. If any bounces occur, the “Set the return-path to match the From Email” option ensures that undeliverable emails are returned to this specific email address. Provide a From Name if desired. Forcing the sender’s name forces the sender’s name to be displayed in the recipient’s email client.
Now we must enter the Client ID and Client Secret that we generated and collected in the previous steps. Now, select “Authenticate with Google & Get Access Token“.
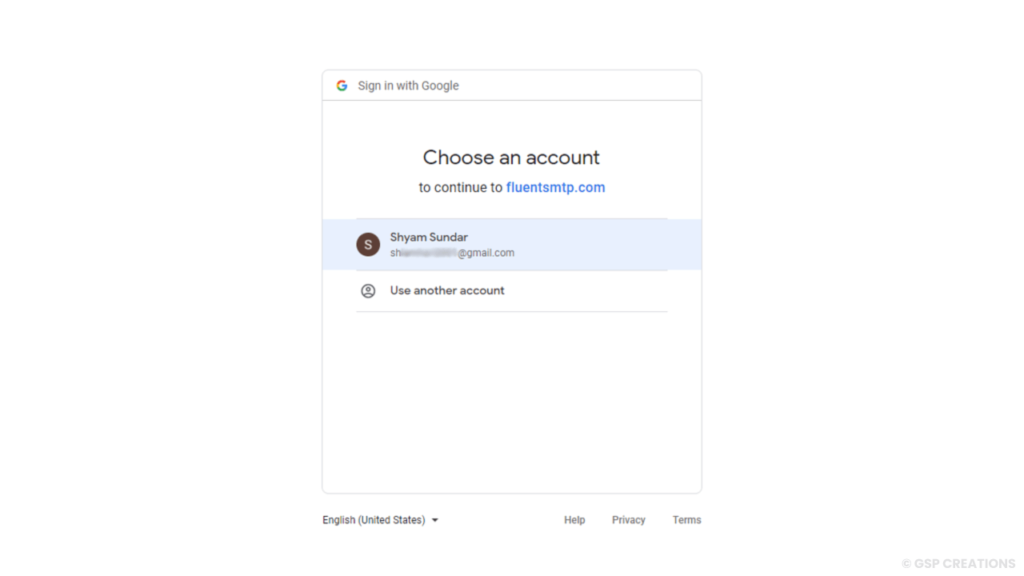
This will redirect us to the Fluent SMTP server, and Google will ask for the account that you wish to grant access to your Gmail or Google Workspace account.
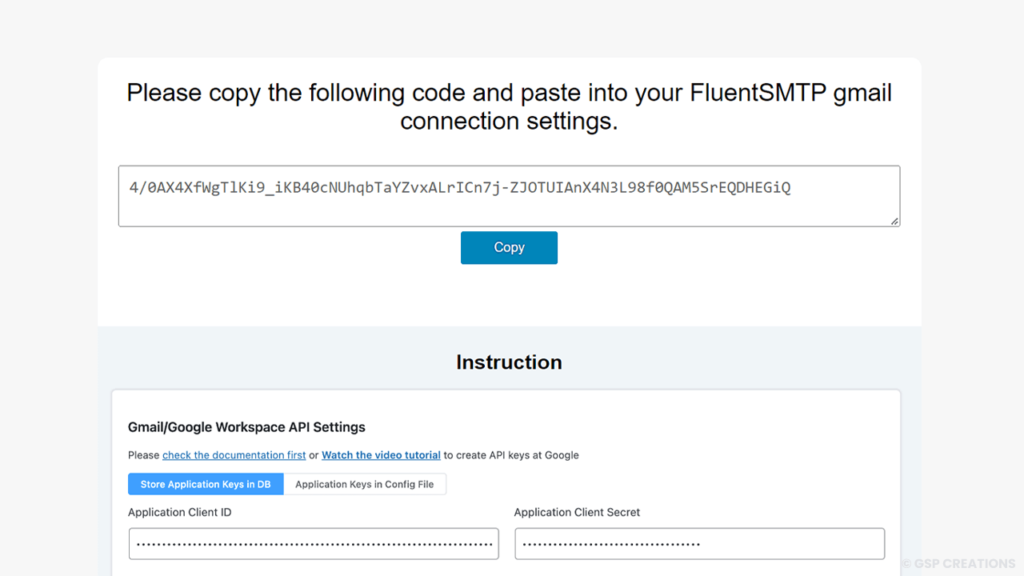
This will connect us to the Fluent SMTP Server and generate an Access Token for us. Click Copy to copy the access token that we’ll need in the next step.
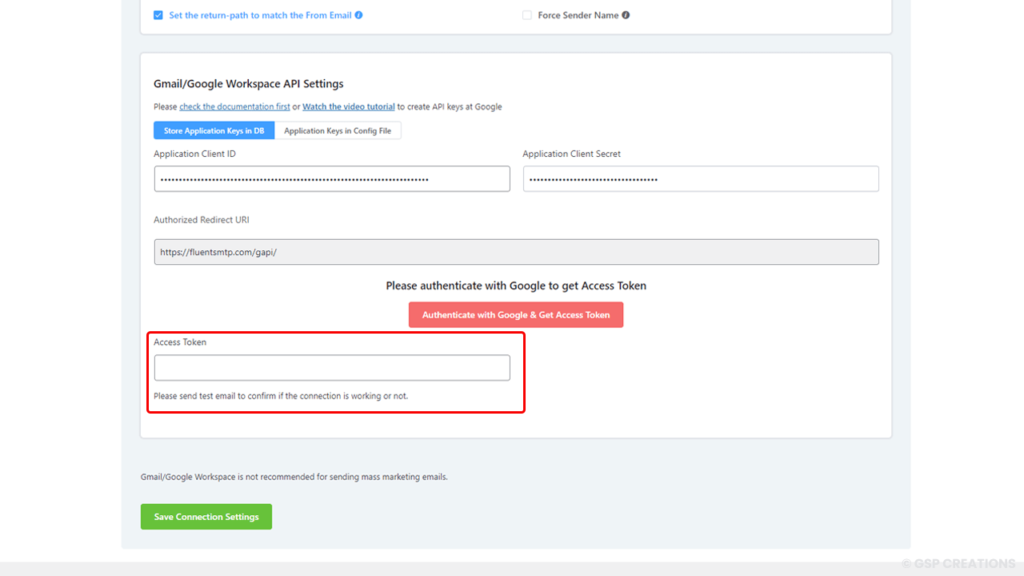
We are now in the final step of configuring Fluent SMTP with a Google Workspace or Gmail email address. In the Fluent SMTP connection settings, paste the copied access token from the previous step and then Save the connection.
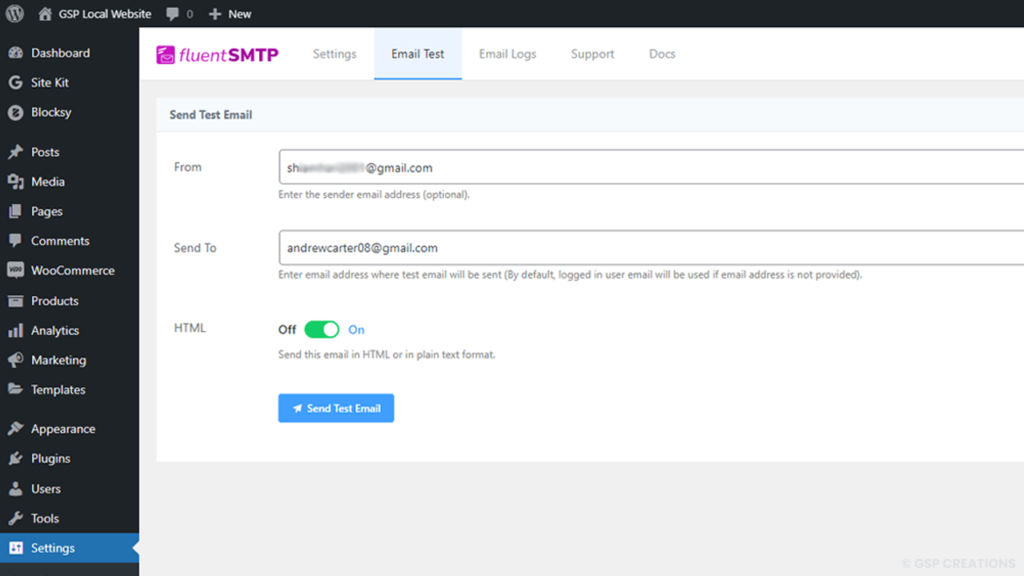
We have completed all of the configuration processes. It’s now time to put the email delivery to the test. From the Fluent SMTP Dashboard, navigate to Email Test. Then, as shown below, enter the From as the configured email address and the Send To as the recipient email address to whom the test email will be sent.
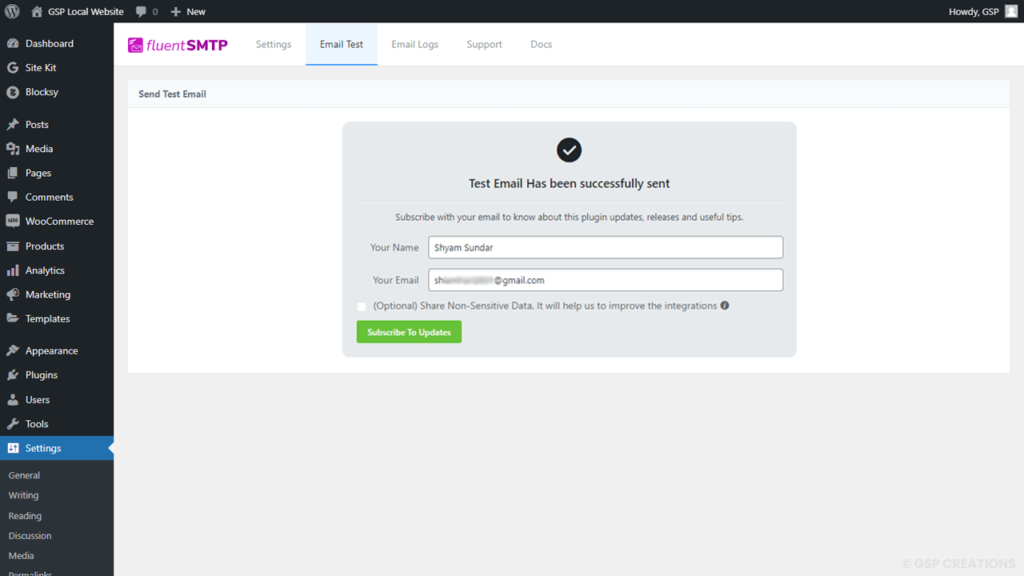
If all of the steps are followed correctly, and the details are valid, the test email will be sent successfully, and a screen similar to the one below will show.
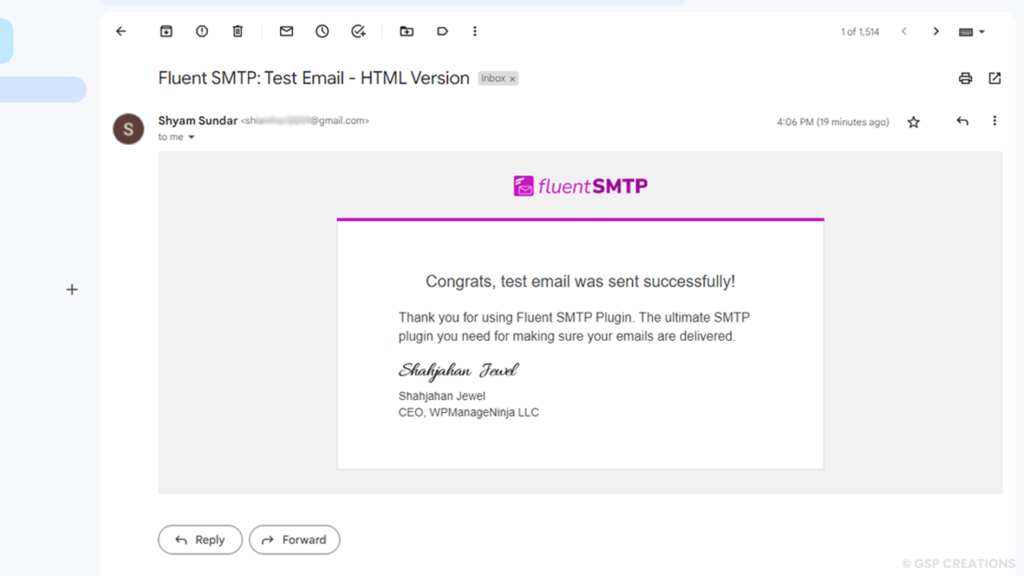
The email will be displayed below, taken from the recipient’s inbox.
An email will be sent to the email account informing us that the FluentSMTP app we generated has been allowed access to Gmail or Google Workspace Email. Don’t be concerned. It’s simply a notification about the activity.
So now you’re ready to use the Fluent SMTP plugin to easily send all of your WordPress emails from Gmail!
Here are some other SMTP setups from Fluent SMTP
Configuring SMTP for your WordPress site is a good idea if you want to improve the delivery rate of your emails. By default, WordPress uses the PHP mail function to send emails, which is not very reliable. Configuring SMTP will allow you to use a more reliable email service, such as Gmail, Amazon SES or Microsoft Outlook, to send emails from your WordPress site.
Video Editing, Web Designing & Motion Graphics Intro, etc...
Join our subscriber’s list to get the latest news, updates directly in your inbox.
Thank you for sharing this informative guide on setting up WordPress SMTP. The step-by-step instructions were clear and easy to follow. I found it useful to explore different SMTP plugins like WP Mail SMTP and Easy WP SMTP. However, it would be great if you could also mention the popular “Postman SMTP” plugin, known for its reliability and user-friendly features. Overall, your blog post is a valuable resource for anyone looking to improve their email deliverability. Well done!
Thank you for your feedback! I’m glad to hear that my guide on setting up WordPress SMTP was helpful and easy to follow. I appreciate your suggestion regarding the “Postman SMTP” plugin, it’s an upcoming popular option among WordPress users for its reliability and user-friendly features. I’ll make sure to mention it in any future updates to my blog post. Thank you for taking the time to provide your valuable feedback, and don’t hesitate to reach out if you have more questions or suggestions!